 Save
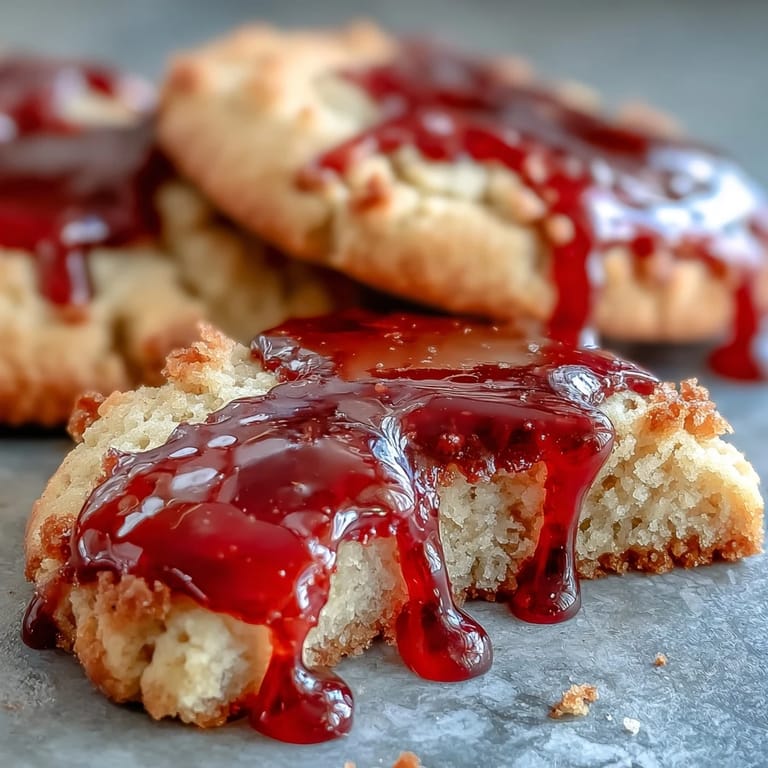
Save My neighbor showed up at my door last October with a plate of these vampire bite cookies, and I was instantly mesmerized by the theatrical blood dripping down the edges. She laughed at my reaction, saying she'd accidentally discovered them while scrolling through Halloween ideas at midnight, sleep-deprived and amused. That night, I made a batch myself, and the whole process felt less like baking and more like creating tiny edible horror props. Now every October, my kitchen smells like buttery vanilla and looks like a crime scene by the time I'm done decorating.
I brought these to a Halloween potluck where someone's toddler grabbed one, took a bite, then gasped in mock horror at the red icing inside. The whole table erupted because this tiny human genuinely seemed betrayed by the cookie's deliciousness, as if expecting something actually sinister. That moment taught me these cookies work on multiple levels—they're funny, they're delicious, and they spark genuine joy in unexpected ways.
Ingredients
- All-purpose flour (2 1/4 cups): Use the spoon-and-level method instead of scooping straight from the bag; it makes a real difference in texture and prevents tough cookies.
- Baking powder (1/2 tsp): This gives the cookies just enough lift to be tender without making them cake-like.
- Salt (1/4 tsp): Amplifies the vanilla and prevents the dough from tasting flat or one-dimensional.
- Unsalted butter (3/4 cup), softened: Room temperature is non-negotiable here; cold butter won't cream properly with the sugar.
- Granulated sugar (1 cup): The fine crystals dissolve into the butter, creating that signature fluffy crumb.
- Egg (1 large): Binds everything together while keeping the cookies tender and helping them hold their shape.
- Vanilla extract (1 1/2 tsp): Use pure vanilla, not imitation; the flavor difference is actually noticeable in something this simple.
- Powdered sugar (1 cup), sifted: Sifting prevents lumps in the icing and gives you a smooth, professional-looking finish.
- Milk (2–3 tsp): Add gradually; you're looking for icing that flows but doesn't run off the cookies immediately.
- Light corn syrup (1/2 tsp): Creates that glossy, wet-looking effect that makes the fake blood actually convincing.
- Red gel food coloring: Gel holds color intensity better than liquid; you'll need less to achieve that deep vampire red.
- Black or dark red gel icing (optional): For adding bite mark details and making everything look delightfully gruesome.
Tired of Takeout? 🥡
Get 10 meals you can make faster than delivery arrives. Seriously.
One email. No spam. Unsubscribe anytime.
Instructions
- Prepare your mise en place:
- Line two baking sheets with parchment paper and preheat your oven to 350°F. Whisk together flour, baking powder, and salt in a medium bowl, then set it aside so you're not scrambling later.
- Cream the butter and sugar:
- Beat softened butter and granulated sugar together for about two minutes until it's light, fluffy, and noticeably pale. This step is where the magic starts; don't skip it.
- Incorporate the wet ingredients:
- Add your egg and vanilla extract, mixing until everything is combined and the mixture looks smooth and incorporated.
- Bring it together gently:
- Add the flour mixture on low speed, mixing just until a soft dough forms. Overmixing develops gluten and creates tough cookies, which defeats the whole purpose.
- Shape and bake:
- Scoop tablespoon-sized portions, roll them into balls, place them two inches apart on your prepared sheets, and flatten them slightly with your palm. Bake for 10–12 minutes until the edges are just golden but the centers still look slightly underbaked; they'll continue cooking on the baking sheet for five minutes before you transfer them to a wire rack.
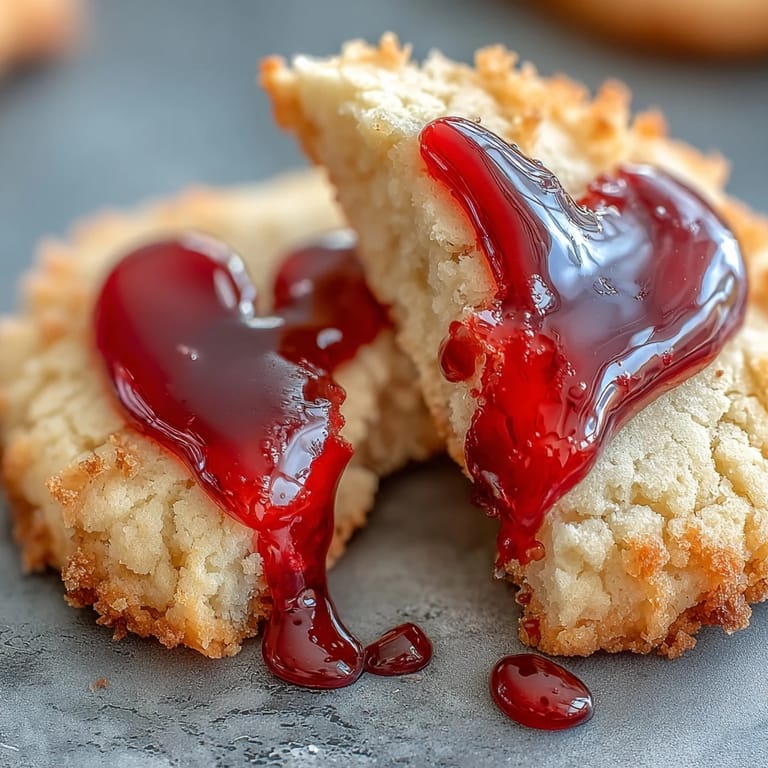
- Create the bite marks:
- Once the cookies are completely cool, use a straw or the end of a chopstick to gently poke two puncture holes near the edge of each cookie, angling them slightly toward each other to suggest actual fangs did this.
- Make your blood icing:
- In a small bowl, mix sifted powdered sugar with milk (adding it one teaspoon at a time), corn syrup, and red gel food coloring until you reach a thick but pipeable consistency. It should flow slowly, not immediately run everywhere.
- Fill the wounds:
- Using a toothpick or small piping bag, carefully fill each bite mark with red icing and let it drip slightly down the cookie for that authentic gruesome effect. A little trail of icing extending from the marks sells the whole story.
- Add final details (optional):
- If you're feeling theatrical, use black or dark red gel icing to outline or enhance the bite marks. Let everything set completely before serving, ideally for 30 minutes so the icing firms up.
 Save
Save My partner watched me meticulously pipe blood trails onto these cookies with the focused intensity of a surgeon, and then asked if I was okay because apparently I looked terrifying. We both laughed so hard that one of the cookies got icing all over my face, which felt appropriately chaotic for a Halloween dessert.
The Softness Factor
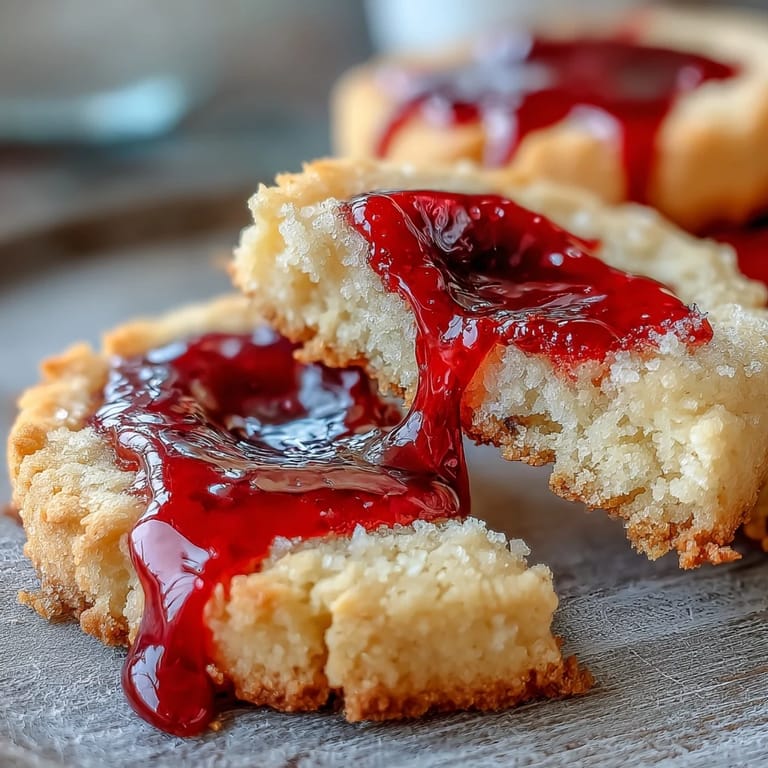
These cookies have a completely different texture than crispy cutout sugar cookies. They're soft, almost tender, with a melt-in-your-mouth quality that comes from not overbaking them. The moment you bite through the glossy red icing into the buttery vanilla interior is genuinely delightful, and honestly, that contrast is what makes them special beyond just the Halloween aesthetic.
Flavor Flexibility
The vanilla base is intentionally simple so it lets other flavors shine through without competition. If you want to experiment, a quarter teaspoon of almond extract adds an unexpected sophistication, while a tiny pinch of nutmeg creates a subtly warm undertone that pairs beautifully with hot chocolate. I've also been tempted to add lemon zest, though I haven't committed to that yet.
Serving and Storage Tips
These cookies stay soft in an airtight container for up to four days, though they somehow taste even better on day two when the flavors have mellowed slightly. They pair beautifully with hot chocolate, mulled wine, or strong coffee, and they're honestly dramatic enough to serve at a party without any other dessert.
- Store decorated and undecorated cookies in separate containers so the icing doesn't transfer or stick.
- If you're making these ahead, bake and cool the cookies first, then decorate within a day or two for the best icing appearance.
- They freeze beautifully undecorated for up to a month, so bake a double batch in September and you'll thank yourself in October.
 Save
Save These cookies have become my favorite seasonal tradition, partly because they're delicious and partly because making them feels like a small, edible prank I'm playing on everyone who eats them. There's something joyful about food that doesn't take itself too seriously while still tasting genuinely wonderful.
Recipe FAQs
- → What creates the shiny effect on the red icing?
The addition of light corn syrup to the icing mix gives it a glossy, shiny finish that enhances the vibrant red color.
- → How are the bite marks made on the cookies?
Bite marks are gently poked into cooled cookies using a straw or chopstick end to create the dramatic detail before icing.
- → Can the dough be prepared ahead of time?
Yes, chilling the dough for 30 minutes before baking helps with handling and improves texture.
- → What ingredient gives the cookies their soft texture?
Using softened unsalted butter combined with sugar and proper mixing results in a tender, buttery texture.
- → Are there any recommended beverage pairings?
Pair these cookies with hot chocolate or mulled wine to complement their sweet and festive character.
- → Can I customize the flavor of the cookies?
Yes, adding almond extract in place of vanilla provides a subtle nutty twist to the flavor profile.